Positioning Rack-1 and checking any expansion racks
About this task
DANGER
HEAVY EQUIPMENT: PERSONAL INJURY OR EQUIPMENT DAMAGE MAY
RESULT IF MISHANDLED (D006)
Procedure
- You must ensure that each expansion rack is installed to
the base rack (Rack-1) that it was originally configured with.
Note: If expansion racks for two storage facilities are accidentally intermixed, a successful installation will not be possible.
- Each rack has a small label
 with its rack S/N above the
front door latch release. See Figure 1.
with its rack S/N above the
front door latch release. See Figure 1. - Each rack has a large label
 with its rack number (position
in the storage facility) and the S/N of the Rack-1 it must be installed to. See Figure 1.Note: Rack-1 may or may not list its own S/N in the S/N of Rack-1 field.
with its rack number (position
in the storage facility) and the S/N of the Rack-1 it must be installed to. See Figure 1.Note: Rack-1 may or may not list its own S/N in the S/N of Rack-1 field.
Figure 1. Rack serial number and rack number labels (Models 98x, 8xE) Note: Rack-4 and Rack-5 not shown. Some models do not use a Rack-3.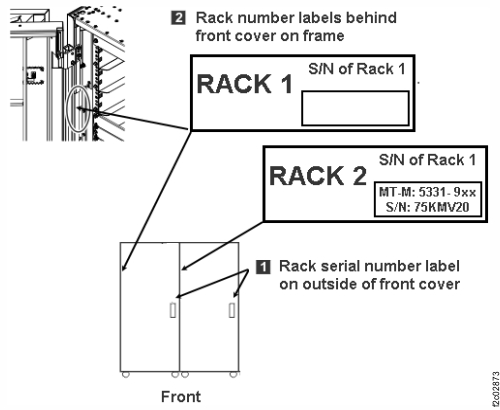
- Each rack has a small label
-
Move Rack-1 to its permanent location and lower the stabilizer feet. If the racks are installed
on a raised floor, position the rack so the rear tailgate is directly over the floor tile
cutouts.
- Move the rack outriggers to stowed (operating) position for final positioning of the rack. To move each outrigger, pull down on the release handle 2 located under the outrigger, and push the outrigger in. Then slide the cover panel 1 down. See Figure 2.
- If the storage facility is configured for overhead cable management (top exit), floor tiles with cutouts may not be required. Refer to step 3 in Checking final preparations .
Figure 2. Outrigger clamp