MAP2460 Configuring and overview of the DS8000 Power Control Mode
This MAP provides guidance on the DS8000® Power Control Mode selections and how to configure them.
About this task
MAP2460 Section-1 Overview of Power Control Panel
The following is overview of Power Control Panel and the power control modes.
About this task
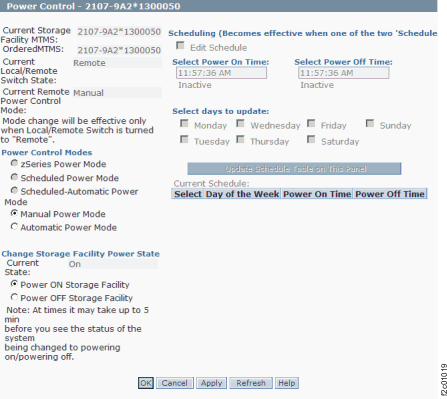
Fields:
- Current Storage Facility MTMS
- Displays the Machine Type Model and Serial number of the currently targeted Storage Facility.
- Local/Remote Switch
- Displays the current position of the Local/Remote switch. This is located on the local remote or
zSeries local remote switch card. Note: The switch must be in the ’Remote’ state for any features on this panel to work.
- Current Power Control Mode
- Displays the active Power Control mode setting. Changes to the Power Control Mode will not take effect until Apply or OK is clicked.
- Power Control Modes
-
- Zseries Power Mode
- This mode is only available if the zSeries Power Control Feature is installed. If the feature is installed, then a zSeries local remote switch card will be present in the DS8000 Rack-1. The zSeries local remote switch card can be distinguished from the local remote switch card in that it has four large connectors, which allow zSeries power control cables to be plugged. If this option is selected, then Power On and Off of the storage facility is controlled by the zSeries host.
- Automatic Power Mode
- Automatic power mode causes the Storage Facility to power up automatically if AC power is restored following an unscheduled AC input loss. This setting can be used in combination with zSeries Power Mode.
- Scheduled Power Mode
- This power mode allows the customer to specify (by using the panel on the right) when the storage facility should power on and power off. The Schedule on the right can be edited when this button is selected and Edit schedule is enabled. The schedule does not become active until Apply is clicked. Transitions will not occur until the next scheduled power off on power on time.
- Scheduled Automatic Power Mode
- This power mode provides the same function as Scheduled Power Mode except that additionally it will cause the storage facility to power up automatically if AC power is restored following an unscheduled AC input loss. That will occur if the AC power is restored inside a Power On window.
- Manual Power Mode
- Selecting this option will enable the Change Storage Facility Power State panel.
- Change Storage Facility State Panel
- This panel is enabled when Manual Power Mode is selected.
Clicking Power On or Power Off followed by Apply or OK will cause the storage facility to power on or power off. If either Apply or OK is clicked, a separate window opens and prompts the user to confirm the selection.
- Scheduling panel
- This becomes active if Scheduled or Scheduled Automatic Power Mode is selected and
Edit Schedule is enabled.
The panel allows the Power On and Off Schedule to be updated and shows a summary of the current choices. Multiple days can be updated simultaneously by selecting them. The selections become active when Apply or OK is selected.
Actions:
- OK
- Clicking OK will perform the selected tasks and exit the panel as well. A separate window opens and prompts the user to confirm the selection.
- Apply
- Clicking Apply will perform the selected tasks without exiting the panel. A separate window opens and prompts the user to confirm the selection.
- Refresh
- Clicking Refresh will update the information on the panel to reflect changes in the storage facility, but will not change anything on the storage facility. For example, if the Local/Remote switch position is changed, then clicking Refresh will change the State as displayed on the panel.
- Cancel
- Clicking Cancel will exit the panel without committing any changes made since the last Apply.
MAP2460 Section-2 How to Select the Power Control Utility
Procedure
To select the Power Control Utility:
- From the navigation area, click .
- From the bottom Task area, click .
MAP2460 Section-3 How to Manually Power On or Off a Storage Facility
Procedure
- Ensure that the Local/Remote Switch is in the 'Remote' position.
- Follow MAP2460 Section-2 How to Select the Power Control Utility to select the storage facility and navigate to the Power Control Panel.
- Click Manual Power Mode.
- On the Change Storage Facility State panel, click Power ON Storage Facility or Power OFF Storage Facility as desired.
- Click OK or Apply and confirm the selection.
- The Power On or Power Off transition will begin.
MAP2460 Section-4 How to set up a Power On and Off Schedule
Procedure
- Follow MAP2460 Section-2 How to Select the Power Control Utility to select the storage facility and navigate to the panel.
- Select Scheduled Power Mode or Scheduled Automatic Power Mode.
- Click Edit Schedule to enable the Scheduling Panel.
- Enter the Power On and Power Off times for the day or days you want to update. If you do not require a Power transition to occur on a particular day or days, then click Inactive as appropriate. For example, if you want to power on Monday at 7:00 AM and remain powered on until 7:00 PM on Friday, then click Inactive for Power off on Monday, Inactive for Power On and Power Off for Tuesday through Thursday and Inactive for Power On on Friday.
- Select the day or days for which you want to set the Power On and Power Off times.
- Click Update Schedule.
- When you are satisfied that the schedule is correct, then click Apply or OK and confirm the selection.