MAP2700 Power distribution unit (PDU) isolation/exchange
MAP2700 Section-1 Entry for SRC list
Procedure
Determine the SRC in the serviceable event that sent you
here.
| SRC | Resource reporting error | Go to: |
|---|---|---|
| 1x0015x0 BED10800 BED10801 |
Single CEC or I/O enclosure power supply (racks 1 and 2 only) | MAP2700 Section-4 Single CEC or I/O enclosure power supply reporting power loss |
| BE1913Fx (x is the rack) | PDU group | MAP2700 Section-3 PDU group is off because of an overcurrent |
| BE19140x (x is the rack) | PDU group | MAP2700 Section-3 PDU group is off because of an overcurrent |
| BE193805 BE193806 |
PDU E25 (racks 1 and 2 only) PDU E26 (racks 1 and 2 only) |
MAP2700 Section-5 Multiple CEC or I/O enclosure power supplies reporting power loss |
| BE1952Cx (x is the rack) | PDU group | MAP2700 Section-3 PDU group is off because of an overcurrent |
| BE1952Dx (x is the rack) | PDU group | MAP2700 Section-3 PDU group is off because of an overcurrent |
| BE3202B9 BE3202BA BE327001 BE327002 |
One or more storage enclosure power supplies | MAP2700 Section-2 One or more storage enclosure power supplies reporting power loss |
MAP2700 Section-2 One or more storage enclosure power supplies reporting power loss
Procedure
- Do the following in the order listed.
Figure 1. Power distribution units (PDUs) location codes 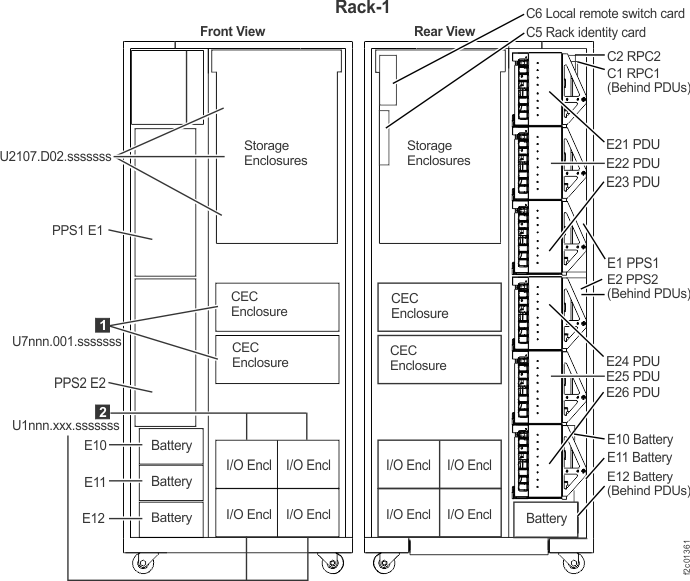
- Observe the storage enclosure power supply
LEDs.
Find the condition that applies:- The Attention LED
 is lit, the DC Input Good LED
  is off. Input power is missing, go
to step 6.
is off. Input power is missing, go
to step 6. - Attention LED is lit, DC Input Good LED is lit and the DC Output Good LED
 is lit or off. Go to step 5.
 - All LEDs , , and are off. Go to step 5.
- The Attention LED is off, the DC Input Good LED is lit, and the DC Output Good LED is lit. The failure is no longer occurring,
exit this MAP and close the serviceable event that sent you here.
Figure 2. Storage enclosure power supply LEDs 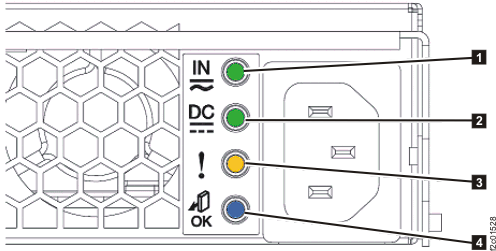
Table 2. Storage enclosure power supply LEDs Index LED name LED color Controlled by LED state Description 1 DC Input Good Green Hardware Solid on DC input good Off DC input not within limits 2 DC Output Good Green Hardware Solid on DC output good Off DC output is off 3 Identify / Attention Amber Microcode Solid on Fault Blinking This FRU being identified Off Default state 4 Not used Blue Microcode Off Default state, unused - The Attention LED
MAP2700 Section-3 PDU group is off because of an overcurrent
A PDU group consists of one, two or three PDUs that share the same input power from two PPS power supplies. An overcurrent (short) condition in one PDU will be detected by both PPS power supplies which will then shutdown their power output. Each pair of PPS modules supply power to only one PDU group.
About this task
Procedure
- The last two columns in Table 3 identify the location
code of both PPS power modules that supply power to each PDU group.
Table 3. PDU power group locations for each rack position Rack PDU group color Location codes for PDUs in each PDU group Rack resources powered by the PDU group Location code of PPS-1 module supplying power to PDU group Location code of PPS-2 module supplying power to PDU group R1 Yellow R1-E21,
R1-E23Storage enclosures R1-E1-E3 R1-E2-E3 R1 Green R1-E22,
R1-E24Storage enclosures R1-E1-E1 R1-E2-E1 R1 Yellow R1-E25 CEC and I/O enclosures R1-E1-S1 n/a R1 Green R1-E26 CEC and I/O enclosures n/a R1-E2-S1 R2 Yellow R2-E21,
R2-E23Storage enclosures R2-E1-E3 R2-E2-E3 R2 Green R2-E22,
R2-E24Storage enclosures R2-E1-E1 R2-E2-E1 R2 Yellow R2-E25 I/O enclosures R2-E1-S1 n/a R2 Green R2-E26 I/O enclosures n/a R2-E2-S1 R3 Yellow R3-E21,
R3-E23,
R3-E25Storage enclosures R3-E1-S1 R3-E2-E1
R3-E2-E3R3 Green R3-E22,
R3-E24,
R3-E26Storage enclosures R3-E1-E1
R3-E1-E3R3-E2-S1 R4 Yellow R4-E21
R4-E23
R4-E25Storage enclosures R4-E1-S1R4-E2-E1
R4-E2-E3R4 Green R4-E22
R4-E24
R4-E26Storage enclosures R4-E1-E1
R4-E1-E3R4-E2-S1Figure 3. PDU location codes, rear view 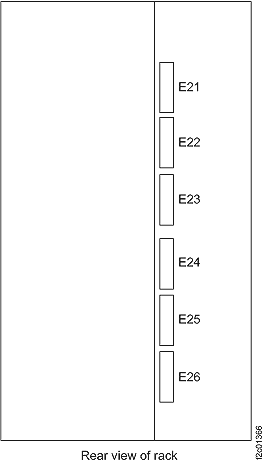 Note: In Figure 4, if this were rack 1 (R1), the list would be R1-Ex-E1, R1-Ex-E2 and so on.
Figure 4. PPS module locations, rear view 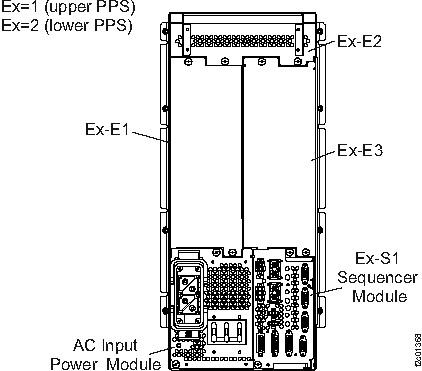
MAP2700 Section-4 Single CEC or I/O enclosure power supply reporting power loss
About this task
Notes:
- Storage complex repair actions must always be managed from the management console. To replace any FRUs identified in this procedure, use Storage Facility Management > storage facility > Exchange Parts. If the FRUs are listed in the Serviceable Event, select them from there.
- To prevent a 100015x2 SRC from being logged when adding or replacing a power supply on an I/O enclosure, immediately (within 10 seconds) after installation connect the power cable to the replacement power supply. If the power supply is not in the ready state and you received a 100015x2 reference code, follow the rest of this procedure.
Attention: When replacing a redundant power
supply in the CEC or I/O enclosures, a 1xxx 1504, 1514, 1524, or 1534
SRC serviceable event may be created. If you just removed and replaced
the power supply in the location associated with this reference code,
and the power supply came ready after the installation, disregard
this reference code and close the serviceable event. If you had not
previously removed and replaced a power supply, the power supply did
not come ready after installation, or there are repeated fan fault
errors after the power supply replacement, continue to follow this
procedure.
Procedure
- On the affected CEC and/or I/O enclosures, observe
the input power LEDs on both power supplies (E1 and E2).
- E1 and E2 power supplies, see Figure 5 and Figure 7.
- CEC enclosure input power LEDs, see Figure 8 index
- I/O enclosure input power LEDs, see Figure 9 indexes and
 .
.
- E1 and E2 input power LEDs are both lit, go to step 5
- E1 or E2 input power LED is not lit, go to step 6
- E1 and E2 input power LEDs are both not lit, attempt to reset the affected CEC or I/O enclosure power using a pseudo-repair of a FRU in the enclosure. Refer to MAP2600 Pseudo FRU exchange needed to reset existing FRU.
- Both power supplies are receiving input power.
Observe the output power LEDs on both power supplies (E1 and E2).
See Figure 8 and Figure 9 indexes and
 . Find the condition that applies:
 - E1 and E2 output power LEDs are both lit, the problem does not seem to be occurring. Exit this MAP and close the serviceable event that sent you here.
- E1 or E2 output power LED is off, replace the failing
power supply.
After the repair process is complete, you will exit this MAP. Go to MAP2700 Section-6 Exit this map and exchange or pseudo-repair a FRU to continue the repair process and replace the power supply listed in the FRU list.If the power supply is not listed in the serviceable event FRU list, refer to MAP1230 Replace a FRU without using a serviceable event.
- E1 and E2 output power LEDs are both off, attempt to reset the affected enclosure power using a pseudo-repair of a FRU in the enclosure. Refer to MAP2600 Pseudo FRU exchange needed to reset existing FRU.
MAP2700 Section-5 Multiple CEC or I/O enclosure power supplies reporting power loss
About this task
Note: Storage
complex repair actions must always be managed from the management
console. To replace any FRUs identified in this procedure, use Storage
Facility Management > storage facility > Exchange Parts.
If the FRUs are listed in the Serviceable Event, select them from
there.
Procedure
- On the affected CEC and/or I/O enclosures, observe the
input power LEDs on both power supplies (E1 and E2).
- E1 and E2 power supplies, see Figure 5 and Figure 7.
- CEC enclosure input power LEDs, see Figure 8 index .
- I/O enclosure input power LEDs, see Figure 9 indexes and .
- E1 and E2 input power LEDs are both lit, go to step 5.
- E1 or E2 input power LEDs are not lit, go to step 6.
- E1 and E2 input power LEDs are both not lit, attempt to reset the affected enclosure power using a pseudo-repair of a FRU in the enclosure. Refer to MAP2600 Pseudo FRU exchange needed to reset existing FRU.
- Both power supplies are receiving input power.
Observe the output power LEDs on both power supplies (E1 and E2).
See Figure 8 and Figure 9 indexes and . Find the condition that applies:
- E1 and E2 output power LEDs are both lit, the problem does not seem to be occurring. Exit this MAP and close the serviceable event that sent you here.
- E1 or E2 output power LED is off, replace the failing power supply. If it is not listed in the serviceable event FRU list, refer to MAP1230 Replace a FRU without using a serviceable event.
- E1 and E2 output power LEDs are both off, attempt to reset the affected enclosure power using a pseudo-repair of a FRU in the enclosure. Refer to MAP2600 Pseudo FRU exchange needed to reset existing FRU.
- The 208 VDC primary bar does not have output
power. Read all the following before replacing any FRUs:
- The 208 VDC primary bus bar is failing and needs to be replaced.
- The 208 VDC primary bus bar is not receiving power from the one PPS it is connected to. Ensure the cable between the PPS and 208 VDC primary bus bar is connected. Check for 208 VDC voltage at primary bus bar end of the cable. Check for 208 VDC voltage at the PPS connector.
- The PPS output connector and circuit is damaged and the PPS cannot detect the output power is missing (not likely).
Figure 5. Location codes for the CEC enclosure (rear view) (Models 941, 951) 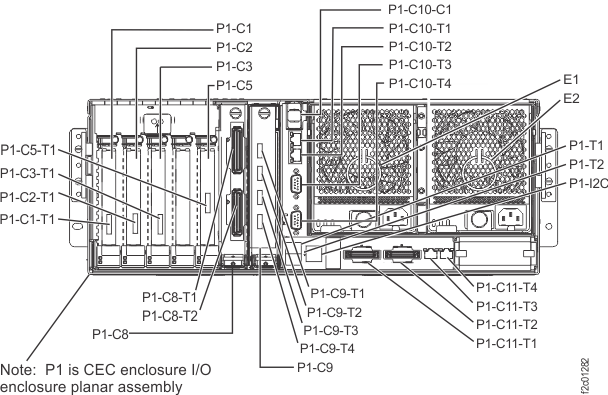
Figure 6. I/O enclosure locations in front of rack 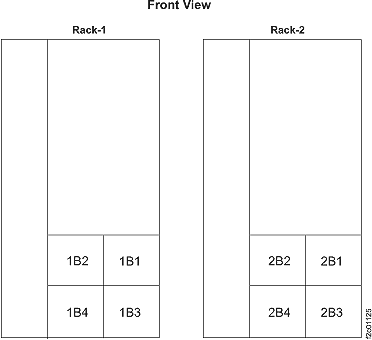
Figure 7. I/O enclosure locations (front) 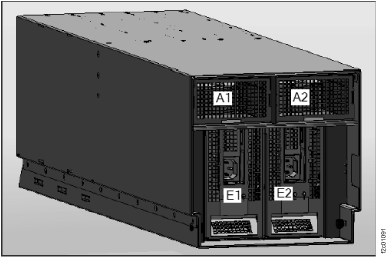
Figure 8. LED CEC enclosure right rear 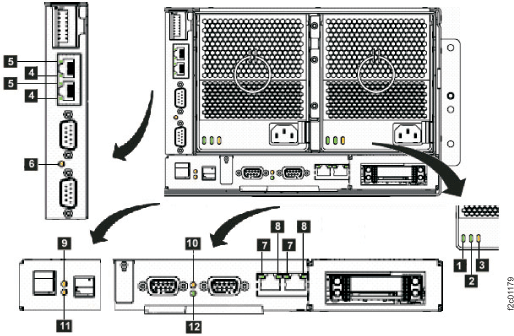
Table 5. Interpreting the LEDs on the CEC enclosure (right rear) Index LED Function Location Color LED Off LED On LED Flash 1 Input power for CEC enclosure power supply E1, E2 green no input input good n/a 2 Output power for CEC enclosure power supply E1, E2 green standby off output on standby 3 Identify for CEC enclosure power supply E1, E2 amber normal n/a fast: identify
slow: com fail4 Link for Ethernet port P1-C10-T1,T2 green link bad link OK n/a 5 Activity for Ethernet port P1-C10-T1,T2 green no activity n/a activity 6 Identify for CEC enclosure VPD pass-through card P1-C10 amber normal n/a identify 7 Link for HMC Ethernet port P1-C11-T3,T4 green link bad link OK n/a 8 Activity for HMC Ethernet port P1-C11-T3,T4 bi-color no activity n/a green: activity 9 Attention and identify for CEC enclosure P1 amber normal attention identify 10 Identify for CEC enclosure service processor card P1-C11 amber normal n/a identify 11 Identify for CEC enclosure I/O backplane P1 amber normal n/a identify 12 Network P1-C11 green (tbd) (tbd) n/a Figure 9. LEDs on the I/O enclosure (front) 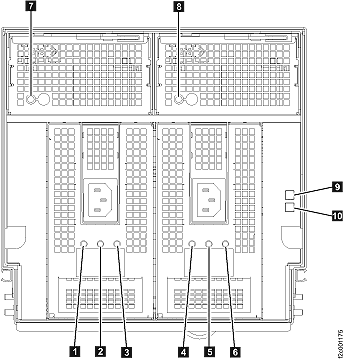
Table 6. Interpreting the LEDs on the I/O enclosure (front) Index LED Function Location Color LED Off LED On LED Flash 1 Input power for I/O enclosure power supply E1 green no input input good n/a 2 Output power for I/O enclosure power supply E1 green standby off output on standby 3 Identify for I/O enclosure power supply E1 amber normal n/a fast = identify, slow = com fail 4 Input power for I/O enclosure power supply E2 green no input input good n/a 5 Output power for I/O enclosure power supply E2 green standby off output on standby 6 Identify for I/O enclosure power supply E2 amber normal n/a fast = identify, slow = com fail 7 Identify for I/O enclosure fan A1 amber normal n/a identify 8 Identify for I/O enclosure fan A2 amber normal n/a identify 9 Identify for I/O enclosure P1 blue normal identify n/a 10 Power for I/O enclosure P1 green power off power on standby