MAP4040 Isolating LPAR operating system boot problems
A checkpoint might be displayed on the operator panel for a period of time while the boot image is retrieved from the device. If the checkpoint is displayed for an extended period of time and the hard drive LED is not indicating any activity, there might be a problem loading the boot image from the device.
MAP4040 Section-1
Procedure
- Yes, this ends the procedure.
- No, go to MAP4040 Section-2.
MAP4040 Section-2
About this task
Procedure
- Log on to the Management Console (HMC) with the CE user ID and password (default serv1cece).
- Use the Service Utilities to quiesce
and shut down the failing partition:
- From the navigation area, click Storage Facility Management > storage facility > SF image.
- From the right work area, select the affected LPAR.
- From the bottom Task area, click Service Utilities > Change/Show LPAR State. The LPAR Server Control window opens.
- Click Quiesce LPAR. Click Yes to confirm.
- Wait 10 minutes until the Quiesce started! window opens. Click OK.
- On the Server Control window, click Refresh to see the current status.
- When the quiesce is complete, click Shutdown LPAR. Click Yes to confirm.
- Wait 10 minutes until the Shutdown started window opens. Click OK.
- On the Server Control window, click Refresh to see the current status.
- Wait until the Operational State is Deactivated.
- Leave the Server Control window open.
- From the bottom Task area, click Service Utilities > Set No-rsStart.
- When the Set No-rsStart Successful window opens, click OK.
- Open a Terminal window:
- From the navigation area, click Storage Facility Management > storage facility > Server View > server.
- From the right work area, select the failing partition (the state of the failing partition is Not Activated).
- From the bottom Task area, click Console Window > Open Terminal Window.
- Activate the partition and interrupt access through the
SMS menus.
- On the Server Control window, click Activate LPAR. Click Yes to confirm.
- Quickly return to the Terminal Window. When the following
screen is displayed, type 1 and press Enter.
IBM IBM IBM IBM IBM IBM IBM IBM IBM IBM IBM IBM IBM IBM IBM IBM IBM IBM IBM IBM IBM IBM IBM IBM IBM IBM IBM IBM IBM IBM IBM IBM IBM IBM IBM IBM IBM IBM IBM IBM IBM IBM IBM IBM IBM IBM IBM IBM IBM IBM IBM IBM IBM IBM IBM IBM IBM IBM IBM IBM IBM IBM IBM IBM IBM IBM IBM IBM IBM IBM IBM IBM IBM IBM IBM IBM IBM IBM IBM IBM IBM IBM IBM IBM IBM IBM IBM IBM IBM IBM IBM IBM IBM IBM IBM IBM IBM IBM IBM IBM IBM IBM IBM IBM IBM IBM IBM IBM IBM IBM IBM IBM IBM IBM IBM IBM IBM IBM IBM IBM IBM IBM IBM IBM IBM IBM IBM IBM IBM IBM IBM IBM IBM IBM IBM IBM IBM IBM IBM IBM IBM IBM IBM IBM IBM IBM IBM IBM IBM IBM IBM IBM IBM IBM IBM IBM IBM IBM IBM IBM IBM IBM IBM IBM IBM IBM IBM IBM IBM IBM IBM IBM IBM IBM IBM IBM IBM IBM IBM IBM IBM IBM IBM IBM IBM IBM IBM IBM IBM IBM IBM IBM IBM IBM IBM IBM IBM IBM IBM IBM IBM IBM IBM IBM IBM IBM IBM IBM IBM IBM IBM IBM IBM IBM IBM IBM IBM IBM IBM IBM IBM IBM IBM IBM IBM IBM IBM IBM IBM IBM IBM IBM IBM IBM IBM IBM IBM IBM IBM IBM IBM IBM IBM IBM IBM IBM IBM IBM IBM IBM IBM IBM IBM IBM IBM IBM IBM IBM IBM IBM IBM IBM IBM IBM IBM IBM IBM IBM IBM IBM IBM IBM IBM IBM IBM IBM IBM IBM IBM IBM IBM IBM IBM IBM IBM IBM IBM IBM IBM IBM IBM IBM IBM IBM IBM IBM IBM IBM IBM IBM IBM IBM IBM IBM IBM IBM IBM IBM IBM IBM IBM IBM IBM IBM IBM IBM IBM IBM IBM IBM IBM IBM IBM IBM IBM IBM IBM IBM IBM IBM IBM IBM IBM IBM IBM IBM IBM IBM IBM IBM IBM IBM 1 = SMS Menu 5 = Default Boot List 8 = Open Firmware Prompt 6 = Stored Boot List Memory Keyboard Network SCSI Speaker - The SMS menu is displayed. Type 1 and press Enter to Select Language.
- The SMS language menu is displayed. Type 1 and press Enter to choose English. The SMS Main menu is displayed.
- Use the SMS menus to display the list
of available boot devices:
- On the SMS Main menu, type 5 and press Enter to choose Select Boot Options.
- On the next menu, type 1 and press Enter to choose Select Install/Boot Device
- On the next menu, type 7 and press Enter to choose List all Devices.
-
Review the list of devices that are found. See the example screen shown below. In
some cases, you might need to enter N (Next page of list) to see the entire list of available boot
devices. Also see Figure 1, Figure 2,
Figure 3, Figure 4,
Figure 5, Table 1, and
Table 2 which show the hard drive location codes for
the different DS8000® models.
PowerPC Firmware Version AL740_075 SMS 1.7 (c) Copyright IBM Corp. 2000,2008 All rights reserved. ------------------------------------------------------------------------------- Select Device Device Current Device Number Position Name 1. - Port 1 - IBM 2 PORT PCIe 10/100/1000 Base-TX Adapter ( loc=U78AA.001.WZSGRLF-P1-C2-T1 ) 2. - Port 2 - IBM 2 PORT PCIe 10/100/1000 Base-TX Adapter ( loc=U78AA.001.WZSGRLF-P1-C2-T2 ) 3. 2 SAS 136 GB Harddisk, part=2 (AIX 7.1.0) ( loc=U78AA.001.WZSGRLF-P2-D2 ) 4. 1 SAS 136 GB Harddisk, part=2 (AIX 7.1.0) ( loc=U78AA.001.WZSGRLF-P2-D1 ) 5. - SAS 136 GB Harddisk, part=4 (AIX 7.1.0) ( loc=U78AA.001.WZSGRLF-P2-D2 ) ------------------------------------------------------------------------------- Navigation keys: M = return to Main Menu ESC key = return to previous screen X = eXit System Management Services ------------------------------------------------------------------------------- Type menu item number and press Enter or select Navigation key:Figure 1. CEC enclosure location codes (front) (model 961) 
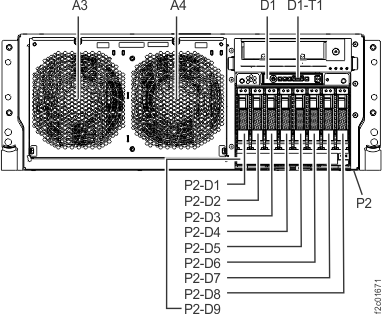
Figure 2. CEC enclosure location codes (front view) (Models 980, 983, 984)
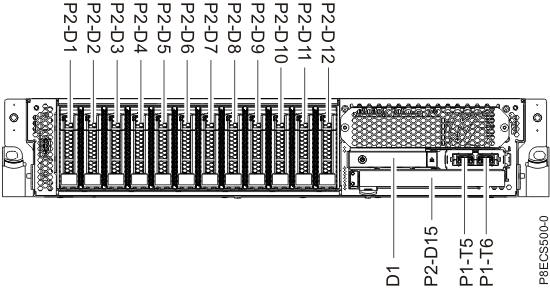
Figure 3. CEC enclosure location codes (front view) (model 981, 985, 986) Note: Model 981 CEC shown, models 980, 984 drive locations are similar.
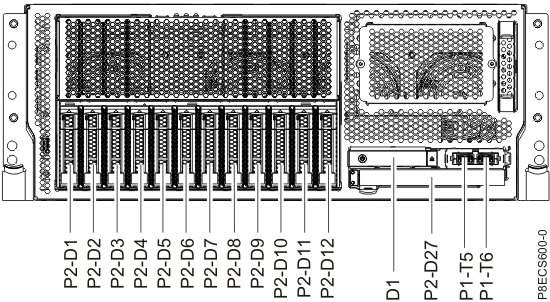
Figure 4. CEC enclosure location codes (front view) (Models 982, 988) 
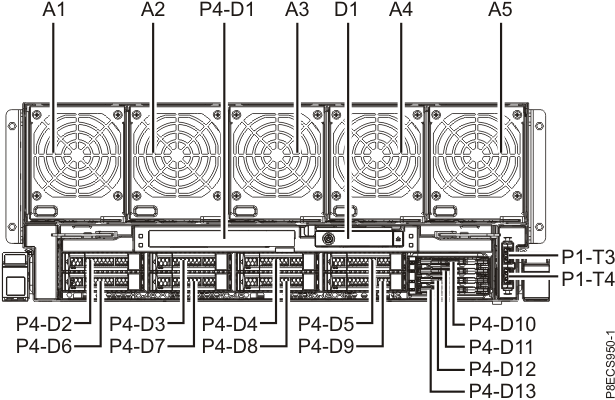
Table 1. Hard drive locations (model 961, 98x) Model Storage Facility Image (SFI) Partition name Location code Primary boot drive Secondary boot drive 961 First SFxxxxxxx01 (in upper CEC) U78AA.001.xxxxxxx-P2-D1 U78AA.001.xxxxxxx-P2-D2 SFxxxxxxx11 (in lower CEC) U78AA.001.xxxxxxx-P2-D1 U78AA.001.xxxxxxx-P2-D2 980, 981, 983, 984, 985, 986 First SFxxxxxxx01 (in upper CEC) U78Cx.001.xxxxxxx-P2-D1 U78Cx.001.xxxxxxx-P2-D2 SFxxxxxxx11 (in lower CEC) U78Cx.001.xxxxxxx-P2-D1 U78Cx.001.xxxxxxx-P2-D2 982, 988 First SFxxxxxxx01 (in upper CEC) U78Cx.001.xxxxxxx-P4-D2 U78Cx.001.xxxxxxx-P4-D6 SFxxxxxxx11 (in lower CEC) U78Cx.001.xxxxxxx-P4-D2 U78Cx.001.xxxxxxx-P4-D6 Figure 5. CEC enclosure locations (front) (models 941, 951) 
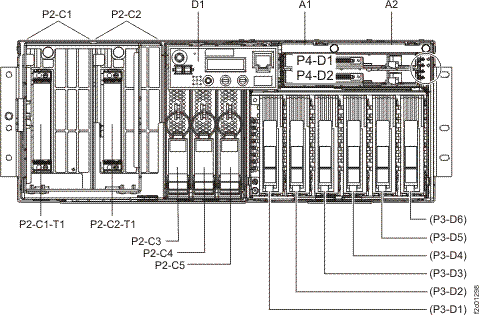
Table 2. Hard drive locations (models 941, 951) Model Storage Facility Image (SFI) Partition name Location code Primary boot drive Secondary boot drive 941, 951 First SFxxxxxxx01 (in upper CEC) U789D.001.xxxxxxx-P3-D1 U789D.001.xxxxxxx-P3-D2 SFxxxxxxx11 (in lower CEC) U789D.001.xxxxxxx-P3-D1 U789D.001.xxxxxxx-P3-D2 Note: The same device might appear multiple times, indicating a multibos installation on that device. For example, the following display shows two partitions on the same hard drive:This is not the same as two separate hard drives.
3. 2 SAS 136 GB Harddisk, part=2 (AIX 7.1.0)
( loc=U78AA.001.WZSGRLF-P2-D2 )
5. - SAS 136 GB Harddisk, part=4 (AIX 7.1.0)
( loc=U78AA.001.WZSGRLF-P2-D2 ) - Are two hard drives listed for the failing partition?
- Yes, go to MAP4040 Section-3
- No, go to MAP4040 Section-4.
MAP4040 Section-3
About this task
Procedure
- Unplug the hard drive that is in position 1 on the boot
list and retry the operation. See Exchange the CEC enclosure disk drive to unplug the hard drive in position 1 on the boot list. Do not install a new drive at this time.
- Type x and press enter to exit the SMS menus and begin loading the operating system. Keep the terminal window open.
- Did the boot problem occur again?
- Yes, go to the next step.
- No, it appears that the unplugged hard drive was
faulty. Record the code level and installation date from the terminal
window login herald. (See an example in MAP4040 Section-5,
step 2.)
Go to MAP4040 Section-5.
- Reinstall the removed hard drive. See Exchange the CEC enclosure disk drive.
- Remove the hard drive in position 2 on the boot list.
- Shutdown and activate the partition to retest it.
- Return to the Server Control window. Click Shutdown. Click Yes to confirm.
- Wait 10 minutes until the Shutdown started window opens. Click OK.
- On the Server Control window, click Refresh to view the current status.
- Wait until the Operational State is Deactivated.
- Click Activate LPAR. Click Yes to confirm.
- Did the boot problem occur again?
- Yes, go to the next step.
- No, it appears that the unplugged hard drive was
faulty. Record the code level and installation date from the terminal
window login herald. (See an example in MAP4040 Section-5,
step 2.)
Go to MAP4040 Section-5.
- There are two likely causes of this problem. Contact your next level of support for
guidance to either:
- Reload both hard drives (see MAP4020 Hard disk drive build process for both boot drives in a storage facility image LPAR
).
Remember that the No-rsStart function has been set for the affected LPAR and must be reset before resuming the LPAR.
- Replace the disk drive backplane assembly (Storage Facility Management > storage facility > Exchange Parts).
- After the repair is complete, go to MAP4040 Section-4, step 8.
- Reload both hard drives (see MAP4020 Hard disk drive build process for both boot drives in a storage facility image LPAR
).
MAP4040 Section-4
About this task
Procedure
- Use Table 1 to identify the location for the hard drive that is not listed.
- Unplug the hard drive that was identified
in step 1 and retry the operation.
- See Exchange the CEC enclosure disk drive to unplug the hard drive identified in step 1. Do not install a new drive at this time
- Type x and press Enter to exit the SMS menus and begin loading the operating system. Keep the terminal window open.
- Did the boot problem occur again?
- Yes, go to the next step.
- No, it appears that the unplugged hard drive was
faulty. Record the code level and installation date from the terminal
window login herald. (See an example in MAP4040 Section-5 ,
step 2.)
Go to MAP4040 Section-5.
- Reinstall the removed hard drive. See Exchange the CEC enclosure disk drive.
- Remove the hard drive that was listed on the boot list.
- Shutdown and activate the partition
to retest it.
- Return to the Server Control window. Click Shutdown. Click Yes to confirm.
- Wait 10 minutes until the Shutdown started window opens. Click OK.
- On the Server Control window, click Refresh to view the current status.
- Wait until the Operational State is Deactivated.
- Click Activate LPAR. Click Yes to confirm.
- Did the boot problem occur again?
- Yes, go to the next step.
- No, it appears that the unplugged hard drive was
faulty. Record the code level and install date from the terminal window
login herald. (See an example in MAP4040 Section-5 ,
step 2.)
Go to MAP4040 Section-5.
- Replace the disk drive backplane assembly
(Storage
Facility Management > storage facility > Exchange Parts).
- After the repair is complete, use step 6 to retest.
Did the boot problem occur again?
- Yes, contact your next level of support.
- No, it appears that the disk drive backplane assembly
was faulty. Record the code level and install date from the terminal
window login herald. (See an example in MAP4040 Section-5 ,
step 2.)
Go to MAP4040 Section-5.
MAP4040 Section-5
About this task
This section cleans up after recovering the LPAR operating system boot problem.
Procedure
- Determine the installed SF LIC level:
- From the navigation area, click Updates.
- From the right work area, select the storage facility.
- From the bottom Task area, click Display Storage Facility Code Levels.
Examples:
SFI Code Levels:
VRMF: 7.7.0.379 locationCode: 8205-E6C*100B7FR-V1
VRMF: 7.7.0.379 locationCode: 8205-E6C*100B7ER-V1
CDA Install History: (Most recent successful update)
Package: SEA.sfi , MTMS: 8205-E6C*100B7ER-V1
Date: 2012/04/23-03:23, Bundle VRMF: 87.0.97.0 , Package Level: 7.7.0.379, Mode: CCL
Package: SEA.sfi , MTMS: 8205-E6C*100B7FR-V1
Date: 2012/04/23-04:00, Bundle VRMF: 87.0.97.0 , Package Level: 7.7.0.379, Mode: CCL
- Compare the code level (code EC) recorded
from the login herald with the installed level (SFI level VRMF, SEA.sfi
package level) obtained in step 1.
Login herald example:
IBM System Storage Enterprise Storage Server (TM) 2107 Model 961 SN 75-YZ581 Server 1 SF75YZ580ESS01 OS Level 7.1.0.403 Code EC 7.7.0.379 Installed on: Apr 23 2012Do the VRMF/EC levels match?
- Yes, go to the next step.
- No, it appears that the LPAR was booted from the wrong
multibos image.
Contact your next level of support to run the "recovery" section of the DS8000 Field Tip entitled "AIX boots old code level (SFG, MES, Rack disc, FSP repair, Model Conversion)." Inform the next level of support that the affected LPAR is already quiesced and that the No-rsStart function has been set.
-
Use the Service Utilities to reset No-rsStart
and resume the affected LPAR. (This step should not be necessary if the "recovery" section was done
in step 2.)
- From the navigation area, click Storage Facility Management > storage facility > SF image.
- From the right work area, select the affected LPAR.
- From the bottom Task area, click Service Utilities > Reset No-rsStart.
- When the Reset No-rsStart Successful window opens, click OK.
- From the bottom Task area, click Service Utilities > Change/Show LPAR State. The LPAR Server Control window opens.
- Click Resume LPAR. Click Yes to confirm. Allow the resume to complete.
- Was the disk drive backplane assembly replaced?
- Yes, this completes this procedure.
- No, it appears that the unplugged hard drive was faulty. A serviceable event should be created that lists the hard drive
to remove as a FRU.
Repair the serviceable event to replace the faulty hard drive. If a serviceable event is not found, the hard drive can be replaced using the Exchange Parts menu (Storage Facility Management > storage facility > Exchange Parts).