MAP4AD0 PPS reset procedure to recover from SRC BE193602, BE193603, BE193802, BE193803

When you install new PPS power firmware on a machine with a PPS code level of 052629 or 062634, the code distribute and activate (CDA) process might fail. Use this MAP to fix the problem.

About this task

  1. Is the PPS code level on this storage facility 062634 or greater? (Refer to MAP1212 Displaying Installed Code Levels (LIC, HMC, Storage Manager, Firmware, OS, PTF, SFI, Bundle VRMF, CDA History) for Power Code levels > FLASH firmware.)
    • Yes, exit this MAP and retry the power firmware update.
    • No, go to the next step.
  2. Contact your next level of support before you proceed with this MAP.
When the CDA process fails, one of the following SRCs will be reported:
Table 1. PPS power firmware reference (error) codes
SRC Condition
BE193602 The PPS-1 (upper) failed to go into firmware download mode.
BE193603 The firmware S-record data transfer to the PPS-1 (upper) failed.
BE193802 The PPS-2 (lower) failed to go into firmware download mode.
BE193803 The firmware S-record data transfer to the PPS-2 (lower) failed.

If there is more than one rack in the storage facility, all of the upper PPSs are updated in parallel and then all of the lower PPSs are updated in parallel. If one PPS fails, it interrupts the parallel process to the other PPSs also. It will be necessary to reset the failed or interrupted PPSs.

MAP4AD0 Section-1

Procedure

  1. Identify the failing PPS using the location code in the serviceable event FRU list that sent you here. E1 is the location code for the upper PPS. E2 is the location code for the lower PPS.
    Note: The failing PPS will have its front red power fault LED off. The working PPS will have its front red power fault LED flashing, to report the failure of the other PPS.
  2. Is there more than one rack in the storage facility?
    • Yes, go to the next step, perform it on each rack, and then go to step 4. For example, if the location of the failing PPS is E2 (the lower PPS), perform step 3 on the lower PPS in each rack, and then go to step 4.
    • No, go to the next step.
  3. Reset the failing PPS.
    Important: In the following step, do not mistakenly disconnect the cable from connector J3a on the 5/12V DDM module.
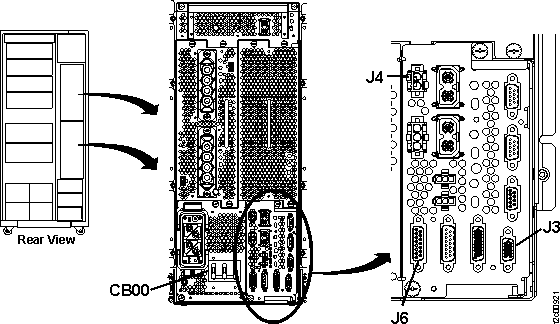
    1. At the rear of the failing PPS, disconnect the cable from connector J3 on the sequencer module. See Figure 1.
      Figure 1. Sequencer module J6
      Sequencer module location for J6
    2. Disconnect the cable from connector J4 on the sequencer module.
    3. Disconnect the cable from connector J6 on the sequencer module.
    4. At the AC input power module (to the left of the sequencer module), switch off (down) the yellow CB00.
    5. Reconnect the cables to connectors J4 and J6 on the sequencer module.
    6. At the AC input power module, switch on (up) the yellow CB00 and wait one minute for the PPS to power up.
    7. Reconnect the cable to connector J3 on the sequencer module.
  4. Retry the PPS power firmware update process.
    Was the update successful?
    • Yes, exit this MAP.
    • No, go to the next step.
  5. Did the failure occur on the same PPS (for example, E1 or E2)?
    • Yes, go to the next step.
    • No, return to step 1.
  6. Replace the PPS sequencer module.
    • The sequencer module code is corrupted and can only be reloaded by the factory.
    • The FRU list includes the PPS as a possible failing FRU. The guided procedure for the PPS will instruct you to replace all five modules that are part of the base PPS FRU.
    • Use the PPS procedure, but only replace the sequencer module.
  7. Retry the PPS power firmware update process.
    Was the update successful?
    • Yes, exit this MAP.
    • No, contact your next level of support.