MAP4AF0 CDA utilities for update of firmware and LPAR LIC on second CEC

About this task

This MAP is called when a LIC update process fails during quiesce, update, or resume of the second managed system or LPAR in a storage facility image, after the first managed system or LPAR was successfully updated.

Use this MAP ONLY when directed from a serviceable event or by next level of support.

MAP4AF0 Section-1

Procedure

  1. Use the HMC to display the partition activation state for each LPAR on the storage facility image.
    Note which LPAR has an operational state that is something other than Operational.
    1. From the navigation area, click Storage Facility Management > storage facility > SF image.
    2. From the bottom Task area, click Service Utilities > Change/Show SFI State.
    Figure 1. Window: SFI Server's Control
    Window: SFI Server's Control
  2. Use the HMC to launch the Verify Bundle Installed utility.

    From the service interface:
    1. From the navigation area, click Updates.
    2. In the upper Updates area, select the storage facility.
    3. From the bottom Tasks area, click Verify Bundle Installed. The Select a Code Level window opens.
    4. Select the LIC bundle level you are installing and click OK. An Action Panel window opens, showing expected and active code levels.
    From the customer interface:
    1. From the navigation area, click the Service drop down menu.
    2. Select Install Firmware > Verify Bundle Installed. The Select a Code Level window opens.
    3. Select the LIC bundle level you are installing and click OK. An Action Panel window opens that displays expected and active code levels.
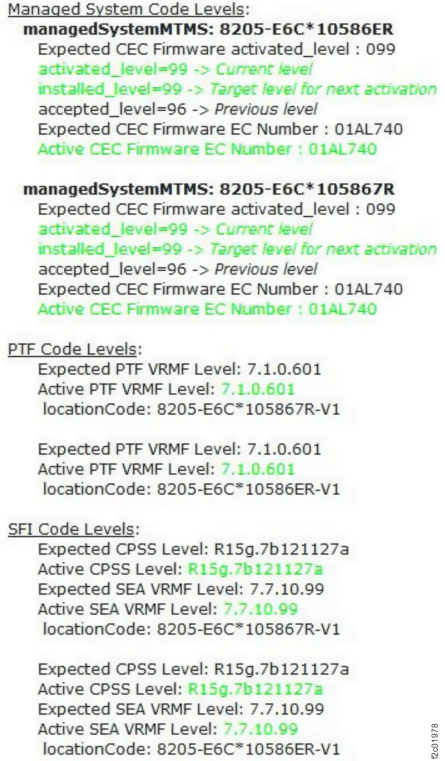
  3. Observe the expected and activated firmware and LIC levels. See Figure 2.
    For each of the following components, compare the active level for each managed system with the expected level:
    1. Managed System Code Levels (CEC Firmware)
    2. PTF Code Levels (PTF VRMF Level)
    3. SFI Code Levels (CPSS Level and SEA VRMF Level)
    Note: In Figure 2, green means the active level matches the expected level; red means the active level is lower than the expected level.
    Figure 2. Expected and active code levels (sample)
    Expected and active code levels (sample)
  4. Do all active levels for each managed system match the expected levels for the selected bundle?
    • Yes, go to step 9 to resume the LPAR and continue the CCL.
    • No, note which components are downlevel (firmware, PTF, SFI) and go to the next step.
  5. Do Managed System Code Levels (CEC Firmware) match the expected levels?
    • Yes, CEC firmware update is not needed, go to step 6.
    • No, update the CEC firmware on the affected managed system.
    1. From the navigation area, click Updates.
    2. In the upper Updates area, select the storage facility.
    3. From the bottom Tasks area, click Recovery Utilities > NCCL Utilities > NCCL eServer Firmware Single Node Update...
    4. A Recovery Procedure window opens, stating:
      This action is disruptive and will cause loss of access.
      Do you still want to continue with this action?

      Click Yes.

      Note: This action is only disruptive to the managed system being updated. As long as the other managed system is still running, customer access is preserved.
    5. An Action Panel window opens. Select the LIC bundle you are applying and click OK.
    6. An Action Panel window opens. Select the managed system (CEC) to be updated and click OK.
      Attention: Selecting the managed system that is still operating will cause loss of access.
    7. A Code Update Progress window opens. Monitor the update progress. When complete, click OK.
    8. A Recovery Procedure window opens, indicating the recovery procedure is completed. Click OK.
  6. Update the LIC levels on the affected managed system.
    Note: This will update both PTF and SFI levels as needed.
    1. From the navigation area, click Updates.
    2. In the upper Updates area, select the storage facility.
    3. From the bottom Tasks area, click Recovery Utilities > NCCL Utilities > NCCL SFI Code Activation Single LPAR -- No IML.
    4. A Recovery Procedure window opens, stating:
      This action is disruptive and will cause loss of access.
      Do you still want to continue with this action?

      Click Yes.

      Note: This action is only disruptive to the managed system being updated. As long as the other managed system is still running, customer access is preserved.
    5. An Action Panel window opens. Select the LIC bundle you are applying and click OK.
    6. An Action Panel window opens. Select the managed system (CEC) to be updated and click OK.
      Attention: Selecting the managed system that is still operating will cause loss of access.
    7. A Code Update Progress window opens. Monitor the update progress. When complete, click OK.
    8. A Recovery Procedure window opens, indicating the recovery procedure is completed. Click OK.
  7. Recheck the expected and activated firmware and LIC levels. Refer to step 2 and step 3.
  8. Do all active levels for each managed system match the expected levels for the selected bundle?
    • Yes, go to the next step.
    • No, note which components are downlevel (firmware, PTF, SFI) and return to step 5, or contact your next level of support.
  9. Use the Service Utilities to reset No-rsStart and resume the affected LPAR.
    1. From the navigation area, click Storage Facility Management > storage facility > SF image.
    2. From the right work area, select the affected LPAR.
    3. From the bottom Task area, click Service Utilities > Reset No-rsStart.
    4. When the Reset No-rsStart Successful window opens, click OK.
    5. From the bottom Task area, click Service Utilities > Change/Show LPAR State. The LPAR Server Control window opens.
    6. Click Resume LPAR. Click Yes to confirm. Allow the resume to complete.
  10. Exit this MAP and resume the CCL to continue updating the remaining components.