Exchange the Ethernet switch tray fan (Model 961)
Before you begin
CAUTION:
This assembly contains mechanical moving parts. Use care when
you service this assembly. (C025)
 Use approved ESD procedures to prevent damage.
Attention:
- This procedure is not a stand-alone procedure. Customer disruption and damage to the hardware might occur when microcode and power boundaries are not in the proper conditions for this service action.
- If a serviceable event FRU repair directed you to this procedure, the microcode and power boundaries are already set.
- If a serviceable event FRU repair did not direct you to this procedure, see MAP1230 Replace a FRU without using a serviceable event.
Notes:
- All the cables and FRUs to be removed must be uniquely identified so they can be reinstalled correctly.
- If an installed earthquake resistance kit prevents you from accessing this FRU, refer to MAP1600.
DANGER
Hazardous
voltage, current, or energy levels are present inside of a component
to which this label is attached. (L001) 
Determine rack version
Procedure
Determine the rack version.
Figure 1. Identifying rack version 1 versus version 2
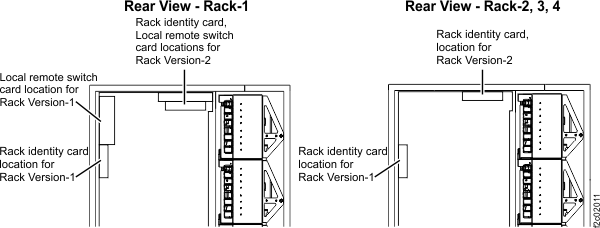
- At the rear of Rack-1, observe the location of the Rack identity and Local remote switch cards. See Figure 1.
- Version 1, the cards are vertical and mounted to the left sidewall, go to Section-1 Rack Version 1.
- Version 2, the cards are horizontal and mounted to the top of the rack, go to Section-2 Rack Version 2.
Section-1 Rack Version 1
Remove the Ethernet switch tray fan (rack version 1)
Procedure
- At the rear of the rack, remove the sheet metal air baffle
above the Ethernet switch tray. See Figure 2.
- Loosen the two screws
 securing the air baffle to
the vertical EIA rails.
securing the air baffle to
the vertical EIA rails. - Lift the air baffle up to clear the two screws .
- The two sections

 of the air baffle pivot around
the pin
of the air baffle pivot around
the pin  .
. - Lift up section slot
 so it clears section tab
  .
. - Pivot both sections towards each other so it easily clears the cables as you take it out of the rack.
Figure 2. Ethernet switch tray air baffle (Model 961) 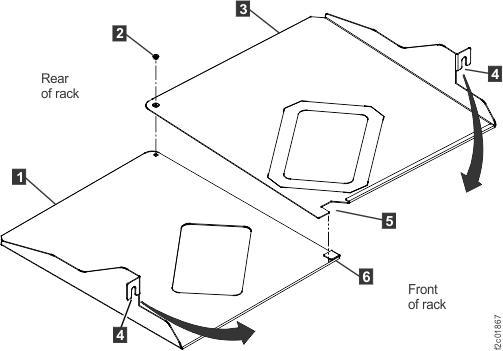
- Loosen the two screws
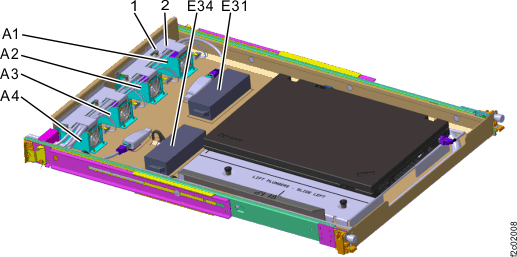
- Locate the fan to be replaced, as shown in Figure 3.
Figure 3. Ethernet switch tray locations (Model 961, rack version 1) 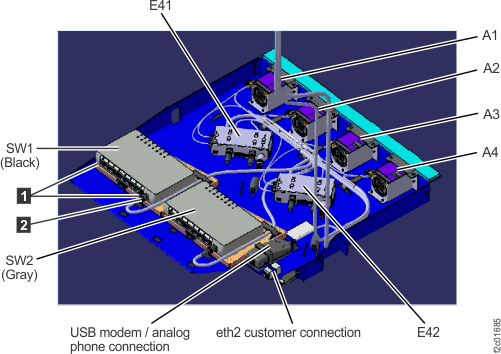
- Remove the fan, as shown in Figure 4:
- Unplug the cable connector to the left of the fan.
- Remove the two Torx T8 screws and the top bracket, then remove the fan.
Figure 4. Ethernet switch tray fan 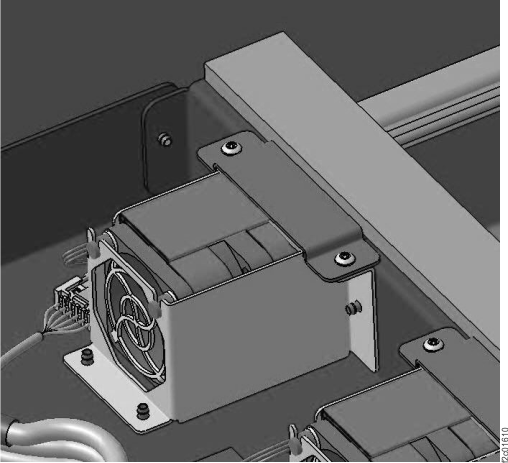
Install the Ethernet switch tray fan (rack version 1)
Procedure
- Install the new fan.
- Install the top bracket and two Torx T8 screws.
- Connect the fan cable.
- Install the air baffle.
- Return to the procedure that sent you here.
Section-2 Rack Version 2
Remove the Ethernet switch tray fan (rack version 2)
Procedure
At the front of the rack, remove the Ethernet switch tray
fan. See Figure 5.
Figure 5. Laptop tray (Model 961) (rack Version 2)
- Ensure the laptop tray is fully extended out to the service position.
- Locate the fan to be replaced.
- Release the two plastic fasteners and then remove the fan hold
down bracket .
- Disconnect the fan cable connector.
- After the fan stops rotating, remove the fan.
Install the Ethernet switch tray fan (rack version 2)
Procedure
- Install the new fan.
- Connect the fan cable.
- Install the fan hold down bracket and secure the two plastic fasteners.
- Return to the procedure that sent you here.