The DS8000®
will be powered on automatically during this procedure. Hazardous voltages will be present. Ensure
that all safety covers are in place and that normal safety precautions are taken.
Procedure
Has it been 30 minutes since the mainline power cables were connected?
No, when you know 30 minutes have elapsed since the mainline power cables were connected, go
to step 2.
Note: Waiting 30 minutes ensures correct management console communication to
the CEC FSPs.
Power on and verification of the new storage facility must be done from the primary management
console (MC 1). If not done previously, prepare the management console keyboard and display for use.
Confirm that the keyboard and monitor cables are connected to the MC 1 ports or selected with the
KVM switch, if used. Confirm that the monitor is powered on. If not done previously, log on to the
management console. The CE user ID and password are as follows:
Once
the installation process is started with the HMC GUI, do not interrupt
the process by rebooting or shutting down the system or the HMC in
any way. Doing so will cause an extended recovery process. Instead,
contact your next level of support if you encounter any problems during
the installation process that are not repaired by using the guided
repair procedures.
Display the storage facility install
state.
From the navigation area, click Storage Facility
Management.
In the right work area, the Install State column displays
the installation state of the storage facility.
Is the Machine Type and Serial Number for the storage facility being installed listed on the panel as
Ready for Field Install?
Yes, select the storage facility to be
installed. Go to the next step.
In the bottom Tasks area, expand Storage Facility Install/Remove. Click
Storage Facility Field Install to start the installation.
Note: After you complete steps 7
through 9, you will monitor
installation status by using Table 1 and Table 2.
Follow the HMC prompts to perform the following tasks:
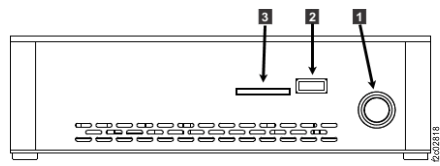
If prompted, install the storage facility configuration media from the new storage facility
into HMC (MC 1) in the existing storage facility. For this model, the media is an SDHC memory card.
See Figure 1. If you are not prompted for configuration media, continue to step 8.
Notes:
In most cases, you are not prompted for configuration media.
Complete this step only if prompted for configuration media.
The configuration information for each storage facility is already stored on the HMC. A backup
copy is shipped with a new storage facility on an SDHC memory card.
If the HMC media card reader slot is sealed with tape, the SDHC memory card should already be in
the slot.
If the HMC media card reader slot is empty, the SDHC memory card should be in the CE envelope.
If not, then check the customer envelope or shipping material.
If prompted for configuration media, you must do one of the following:
Determine if the SDHC memory card is in the HMC media card slot ( 3 Figure 1); if it is, proceed. If it is
not, locate it and insert it, then proceed. After the installation is complete, leave the SDHC
memory card in the HMC media card slot. It is ready to use for error data offload.
If you cannot find the HMC media, stop and call the next level of support.
Figure 1. Model 99x management console (front)
The next HMC message will indicate that the Storage Facility Field Install process will now
continue with power on and verification.
This message refers to the software installation process. This action can take up to 1.5 hours
to complete.
The message directs you to return to the Storage Facility Installation Instructions to
perform other actions. This is the step that you will return to.
The software installation is not finished until you complete step A3 in Table 1.
There are additional installation steps that are required after the software installation
process is complete.
Click OK to close the message and continue the installation
process.
Note: If errors occur during the automated installation process, on-screen messages direct you to
MAP1400 Repair a problem found during install storage facility process. Use the guidance in that
MAP to resolve the problem and then restart the installation process.
If prompted to perform drive certify, answer "Yes".
Note: Flash drive certify is normally automatic (you are not prompted).
To minimize the installation time, activities from Table 1 can be performed in parallel with activities from
Table 2.
Use Table 1 to monitor and respond to the progress
of the installation screens.
Note:In some cases, the installation status screens will
update at the bottom, so you might need to scroll down to see the latest status.
Use Table 2 to continue the remaining installation
tasks.
Table 1. Monitor the progress of the installation screens
A message displays that indicates Field Installation Verification for the
Storage Facility has completed. You might be asked to check whether any problems were logged. Read
the on-screen instructions carefully, keep the message box open and do not reply to the
message until after you have checked for problems.
A4
A message notifies you that field installation verification completed
successfully. A second message might appear, notifying you that the drive certify process has
started. Continue with Table 2