Exchange the storage enclosure power supply
Before you begin
 Use approved ESD procedures to prevent damage.
Attention:
- This procedure is not a stand-alone procedure. Customer disruption and damage to the hardware might occur when microcode and power boundaries are not in the proper conditions for this service action.
- If a serviceable event FRU repair directed you to this procedure, the microcode and power boundaries are already set.
- If a serviceable event FRU repair did not direct you to this procedure, see MAP1230 Replace a FRU without using a serviceable event.
Notes:
- All the cables and FRUs to be removed must be uniquely identified so they can be reinstalled correctly.
- If an installed earthquake resistance kit prevents you from accessing this FRU, refer to MAP1600.
Remove the storage enclosure power supply
Before you begin
Attention: Power supplies are hot-pluggable FRUs. Only remove one power supply at a
time.
Procedure
- At the rear of the rack, observe the partner power supply, which is not being replaced,
in this storage enclosure. See Figure 1. The input power good LED
 on the partner power supply must be lit before going to the next step. This will ensure that the
storage enclosure remains powered while the failing power supply is removed. If the power good LED
is not lit, DO NOT CONTINUE. Instead contact your next level of support.
on the partner power supply must be lit before going to the next step. This will ensure that the
storage enclosure remains powered while the failing power supply is removed. If the power good LED
is not lit, DO NOT CONTINUE. Instead contact your next level of support.- DC input good
 DC output good
 Identify/attention
 Not used
Figure 1. Storage enclosure power supply LEDs 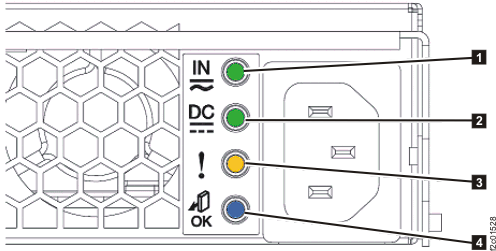
- Observe the storage enclosure power supply that is being replaced.
- The input power LED
and the output power LED
will still be lit even though the HMC screen indicates the FRU was powered off. This is normal.
- The power LEDs will be off after the input power cord is disconnected in the next step.
- The input power LED
-
At the power supply being replaced, release the power input cable from the retention bracket
and disconnect it. See
Figure 2.
Note: After the power input cable is disconnected, storage enclosure fans in the other power supply will shift from low to high speed.
Figure 2. Storage enclosure power supply power input cable and retaining bracket 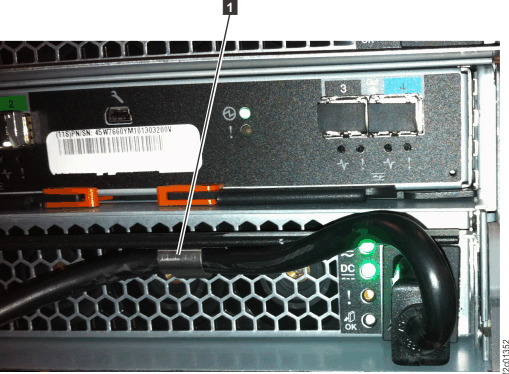
-
To remove components from the rear of the storage enclosure, you might need to:
- Loosen cable ties
- Remove the cable tray from the enclosure being serviced or the enclosure above it
- Loosen or release the cable ties holding the FC-AL and power cables as needed.
- If you need to remove the cable tray, release the cable ties. Then, lift up on the spring-loaded latches at the left and right end of the tray and then slide the tray to the rear. See Figure 3.
Figure 3. Cable tray spring-loaded latch 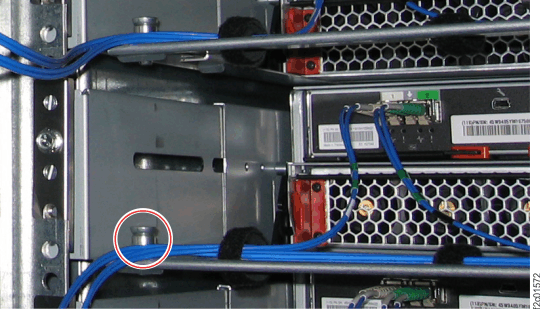
-
Push the orange retaining clip to the right, and pull the power
supply latch handle out
and down. See Figure 4.
Figure 4. Storage enclosure power supply latch handle and retaining clip 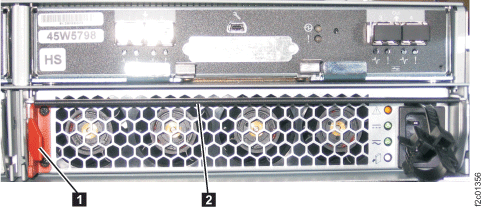
Install the storage enclosure power supply
Procedure
- Slide the new power supply into the storage enclosure and push the power supply latch handle up and in until it latches into place.
- If the Ethernet switch tray air baffle was removed, reinstall it now.
- Install the sheet metal cable tray, if it was removed. Ensure both spring-loaded latches are secure.
- Secure the FC-AL cables and power cables with the cable ties, as needed.
- Connect the input power cord to the power supply.
- Secure the input power cord with the retention bracket.
- Exit this service information center parts exchange procedure and return to the procedure that sent you here.